XCM
XCM Documentation
For a more practical approach to utilizing XCM, refer to the Polkadot Docs. Please keep in mind that XCM is under active development.
The Cross-Consensus Message Format, or XCM, is a messaging format and language used to communicate between consensus systems.
One of Polkadot's main functionalities is interoperability amongst parachains and any other participating consensus-driven systems. XCM is the language through which complex, cross-consensus interactions can occur. Two blockchains can "speak" XCM to seamlessly interact with each other using a standard messaging format.
Info
We typically discuss XCM in the context of parachains, but please bear this in mind that it expands to the domain of all consensus systems! Remember, a consensus system here means any system or protocol that achieves finality to agree on the latest and correct state, whether it's a Polkadot parachain, an EVM smart contract, or other bridged consensus systems.
XCM is not meant to be only specific to Polkadot, but rather its primary intention is to define a generic and common format amongst different consensus systems to communicate.
It's important to note that XCM does not define how messages are delivered but rather define how they should look, act, and contain relative instructions to the on-chain actions the message intends to perform.
XCMP, or Cross Chain Message Passing, is the actual network-layer protocol to deliver XCM-formatted messages to other participating parachains. There are other ways to define transport layer protocols for delivering XCM messages(see: HRMP and VMP).
XCM has four high-level core design principles which it stands to follow:
- Asynchronous: XCM messages in no way assume that the sender will be blocking on its completion.
- Absolute: XCM messages are guaranteed to be delivered and interpreted accurately, in order and in a timely fashion. Once a message is sent, one can be sure it will be processed as it was intended to be.
- Asymmetric: XCM messages, by default, do not have results that let the sender know that the message was received - they follow the 'fire and forget' paradigm. Any results must be separately communicated to the sender with an additional message back to the origin.
- Agnostic: XCM makes no assumptions about the nature of the consensus systems between which the messages are being passed. XCM as a message format should be usable in any system that derives finality through consensus.
These four crucial design decisions allow for XCM messages to be a reliable yet convenient way to properly convey the intentions from one consensus system to another without any compatibility issues.
Note
XCM is constantly in development - meaning the format is expected to change over time. XCM v3 is the latest version, and is deployed on Polkadot. To view updates on the XCM format, visit the xcm-format repository to view any RFCs that have been submitted that would contribute to the next release.
A Format, Not a Protocol
What started as an approach to cross-chain communication, has evolved into a format for Cross-Consensus Communication that is not only conducted between chains, but also between smart contracts, pallets, bridges, and even sharded enclaves like SPREE.
XCM cannot actually send messages between systems. It is a format for how message transfer should be performed, similar to how RESTful services use REST as an architectural style of development, where HTTP requests contain specific parameters to perform some action.
Similar to UDP, out of the box XCM is a "fire and forget" model, unless there is a separate XCM message designed to be a response message which can be sent from the recipient to the sender. All error handling should also be done on the recipient side.
Info
XCM is not designed in a way where every system supporting the format is expected to be able to interpret any possible XCM message. Practically speaking, one can imagine that some messages will not have reasonable interpretations under some systems or will be intentionally unsupported.
Furthermore, it's essential to realize that XCM messages by themselves are not considered transactions. XCM describes how to change the state of the target network, but the message by itself doesn't perform the state change.
This partly ties to what is called asynchronous composability, which allows XCM messages to bypass the concept of time-constrained mechanisms, like on-chain scheduling and execution over time in the correct order in which it was intended.
XCM Tech Stack
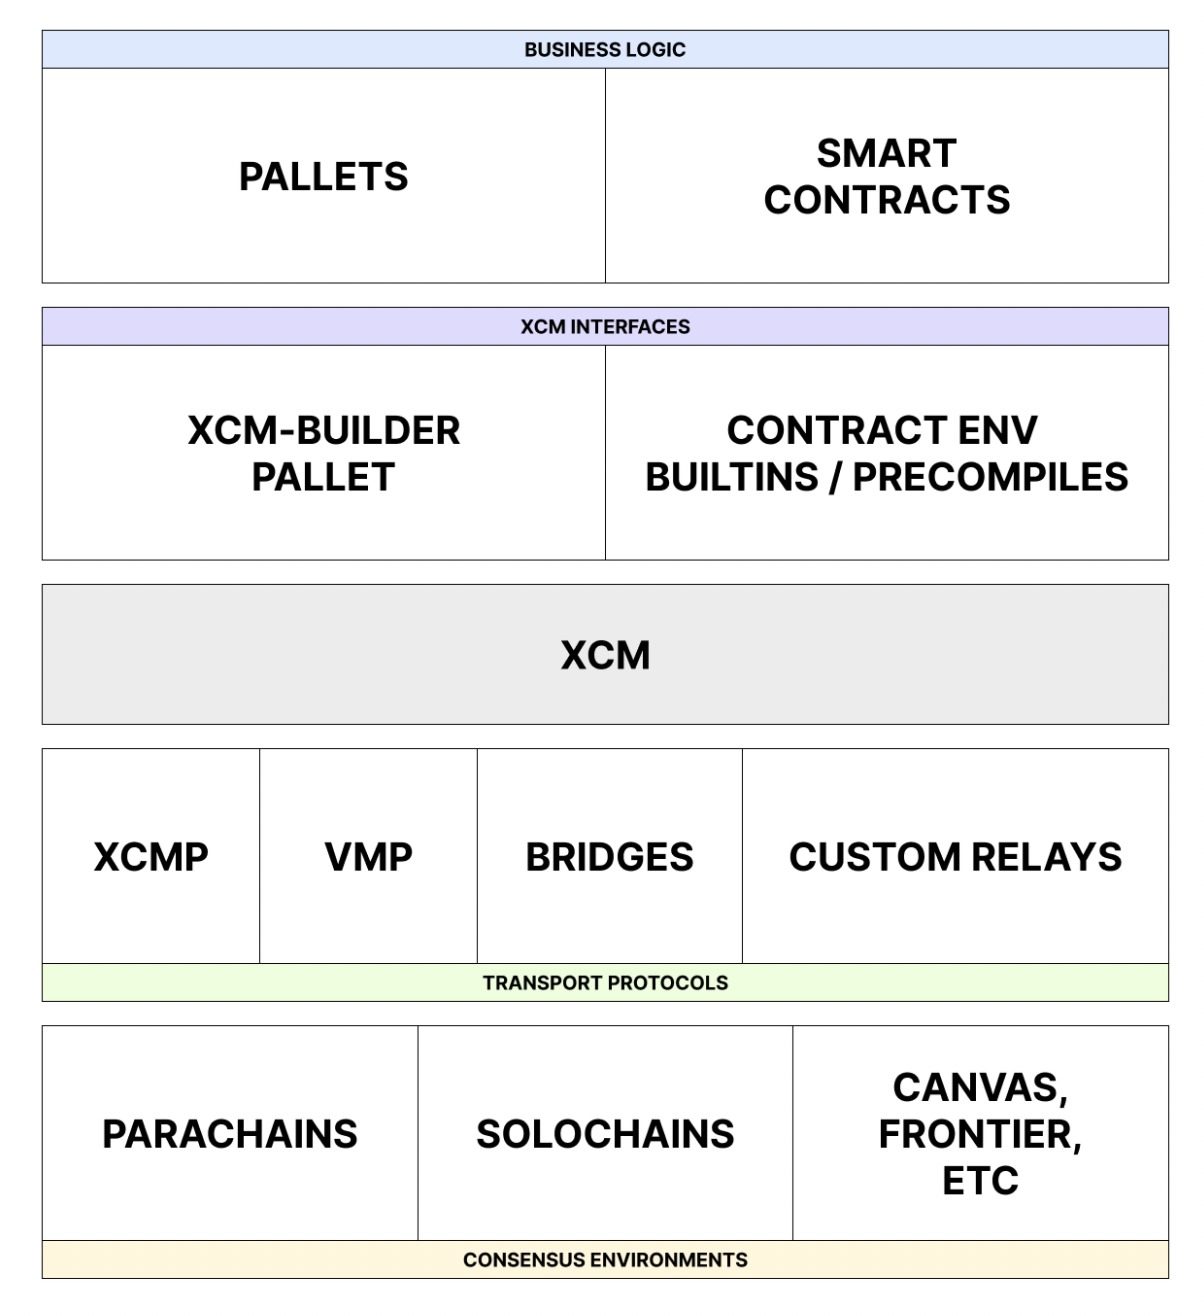
XCM can be used to express the meaning of the messages over each of these three communication channels.
Core Functionality of XCM
XCM opens the doors to a multi-hop, multi-network communications.
XCM introduces some key features and additions to cross-consensus messaging, including:
-
Programmability - the ability to have expectations for messages, which allow for more comprehensive use cases, safe dispatches for version checking, branching, and NFT/Asset support.
-
Functional Multichain Decomposition - the ability to define mechanisms to cross-reference and perform actions on other chains on behalf of the origin chain (remote locking), context/id for these messages, and asset namespacing.
-
Bridging - introduces the concept of a universal location, which allows for a base reference for global consensus systems for multi-hop setups. This location is above the parent relay chain or other consensus systems like Ethereum or Bitcoin.
A core part of the vision that XCM provides is improving communication between the chains to make system parachains a reality. For example, the Polkadot relay chain handles more than just parachain management and shared security - it handles user balances/assets, governance, and staking. Ideally, the relay chain should be for what it's intended to be - a place for shared security. System parachains can alleviate these core responsibilities from the relay chain but only by using a standard format like XCM.
This is where system parachains come in, where each of these core responsibilities can be delegated to a system parachain respectively.
Info
XCM bridging, functional multichain decomposition, and programmability upgrades are crucial to bringing ecosystems together using a common communication abstraction.
For more information on the specific instructions used for these key features, head over to the instructions and registers page.
Cross-Consensus Message Format (XCM Format)
For an updated and complete description of the cross-consensus message format please see the xcm-format repository on GitHub.
Resources
-
Shawn Tabrizi: XCM - The Backbone Of A Multichain Future | Polkadot Decoded 2022 - High level overview which should answer “What is XCM?
-
XCM: The Cross-Consensus Message Format - Detailed blog post by Dr. Gavin Wood about the XCM Format.
-
XCM Format specification - The best starting point for understanding the XCM API at a technical level.
-
Gavin Wood, Polkadot founder: XCM v3 | Polkadot Decoded 2022 - High level overview of XCM and specifically the new features available in XCM v3.
-
XCMP Scheme - An overall overview of XCMP describing a number of design decisions.
-
Messaging Overview - An overview of the messaging schemes from the Polkadot Parachain Host Implementor's guide.
-
Sub0 Online: Getting Started with XCM - Your First Cross Chain Messages - Code focused workshop on how XCM v1 works, and the core concepts of XCM.
-
XCM: Cross-Consensus Messaging Audit - Technical audit report by Quarkslab prepared for Parity.
-
XCM pallet code - The pallet that contains XCM logic from the Polkadot code repository
-
XCM Config & Pallet-XCM | Polkadot Deep Dives - A technical deep dive into
pallet-xcmand the XCM configuration.