Polkadot OpenGov
See this page to learn about Polkadot OpenGov.
This guide will instruct token holders how to propose and vote on public referenda using the Referenda module (OpenGov). Below are a few links to stay informed and directly engage with the community.
- Polkadot Direction - a place to discuss governance and the future of Polkadot.
- Kusama Direction - a place to discuss governance and the future of Kusama.
- Polkadot and Kusama Polkassembly - for current referenda, latest proposals, motions, treasury proposals, tips, bounties, and more.
- Polkadot Daily Digest - News about what is happening in the Polkadot ecosystem, published every weekday except holidays.
Create a Referenda Proposal
Before submitting a referendum, identify the right track and origin for it. For instance, if the referendum is for requesting funds from treasury, select the treasury track with appropriate spend limits. If the referendum is for a suggestion to make changes to the protocol, select the "Wish for Change" track. For more info, check the tracks and origins of Polkadot OpenGov.
Submitting a Preimage
The act of creating a proposal is split from submitting the preimage for the proposal since the storage cost of submitting a large preimage could be expensive. Allowing the preimage submission to come as a separate transaction means that another account could submit the preimage for you and pay the fee. The example below demonstrates the creation of a preimage to propose and approve a spend of treasury funds.
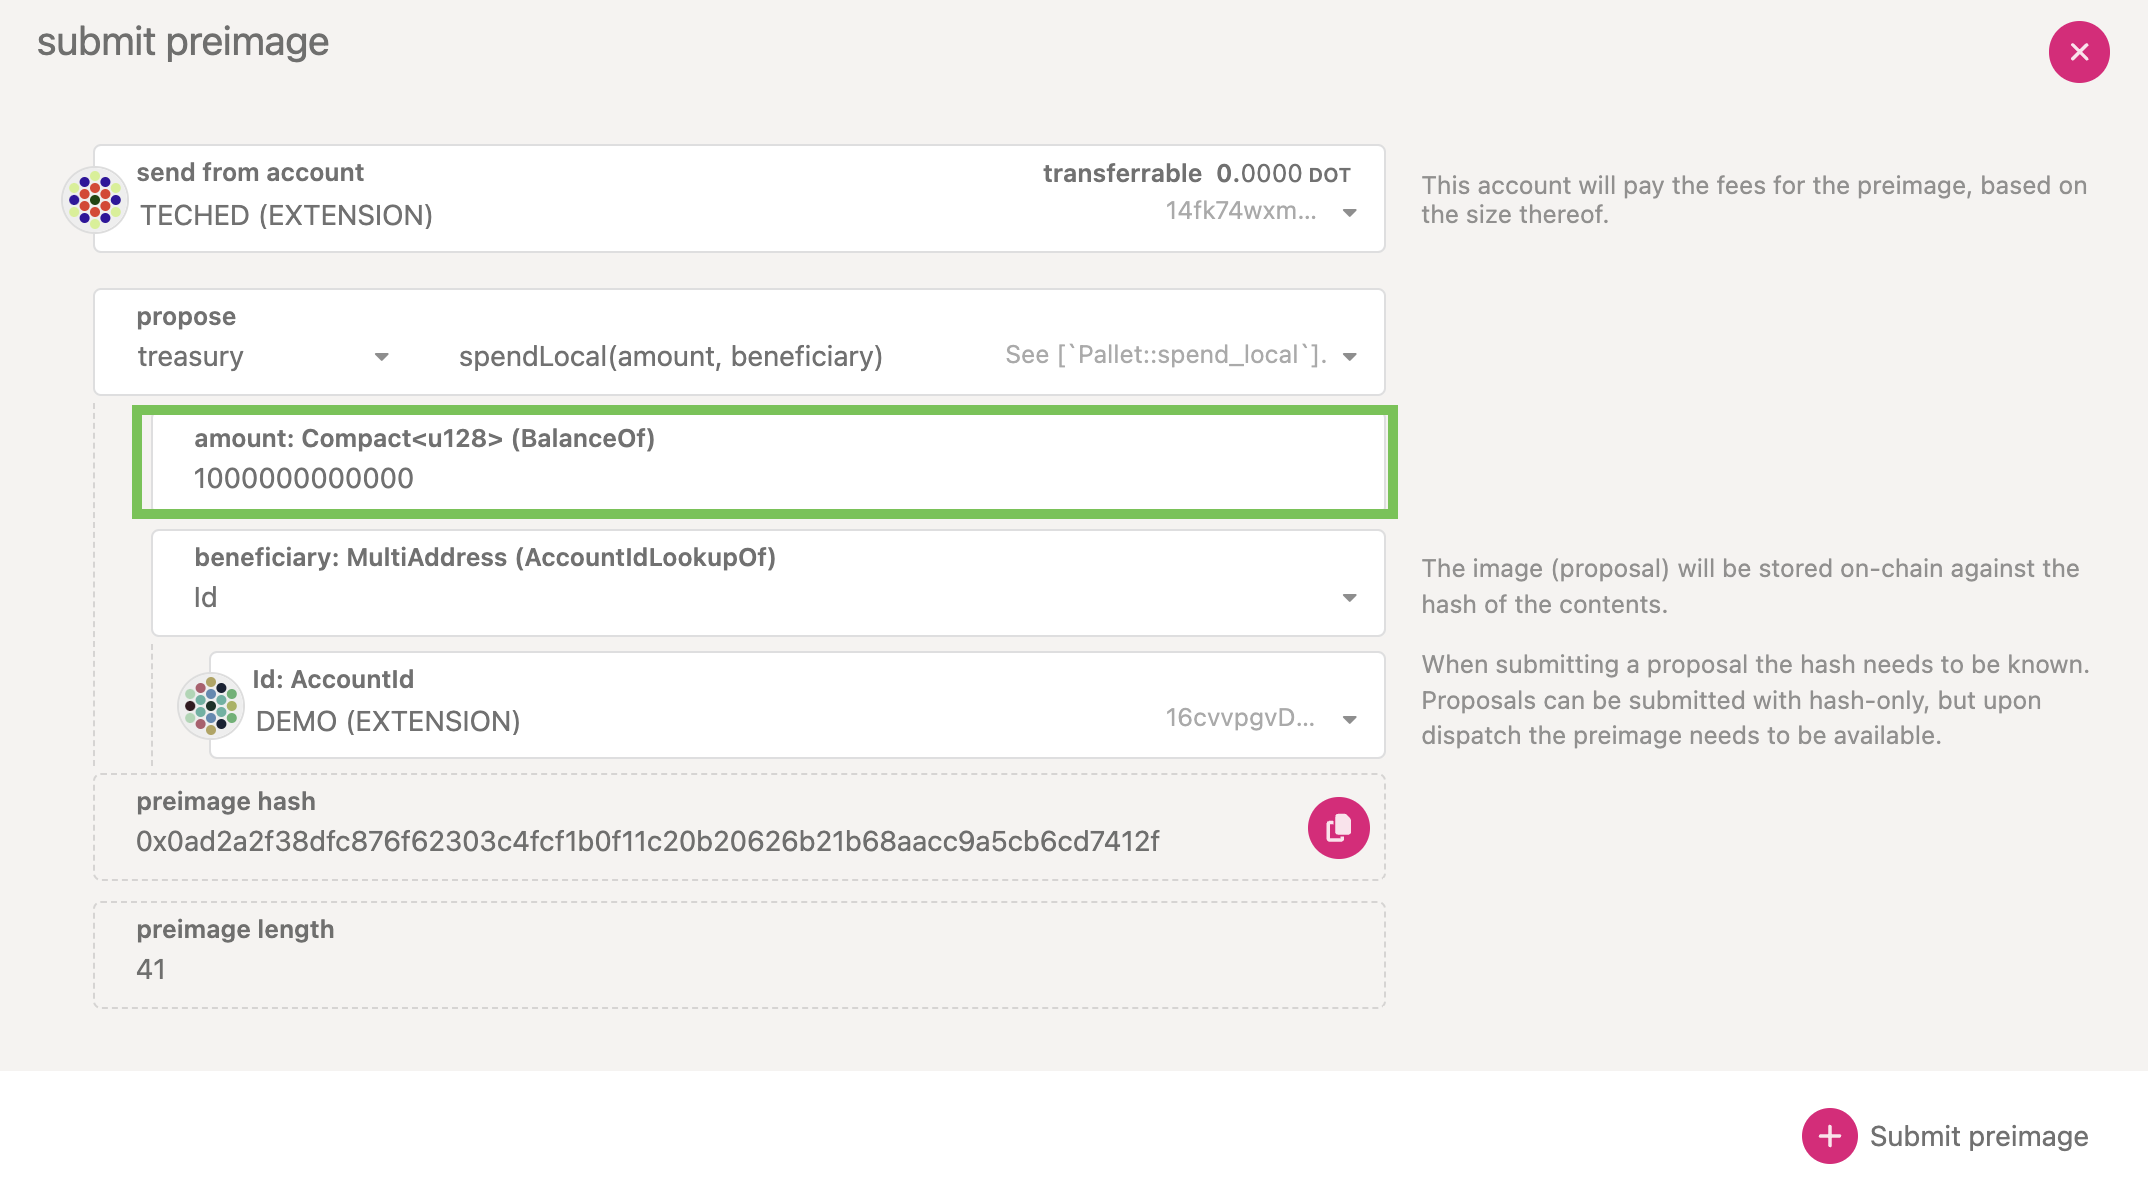
Follow the steps below to submit a preimage as shown in the screenshot above.
- Navigate to Governance -> Referenda.
- Click on the "Add preimage" button.
- From the propose drop-down field, select
treasury. - From the unlabeled drop-down field to the right of the propose drop-down field, select
spendLocal(amount, beneficiary). - In the
amount: Compact<u128> (BalanceOf)text field, enter the spend amount in plancks. - The
beneficiary: MultiAddress (AccountIdLookupOf)drop-down field will haveIdselected by default. Select the beneficiary from theId: AccountIddrop-down field.
!!!info Copy the preimage hash value before clicking the "Submit preimage" button.
- Click the "Submit preimage" button.
After the preimage is submitted successfully on-chain, Polkadot-JS UI lists it under the tab of Governance -> Preimages.
Submitting a Proposal
Submitting a proposal requires you to bond some tokens. On Polkadot-JS UI, you can navigate to the Governance -> Referenda to make a new proposal. In order to submit a proposal, you will need to submit what's called the preimage hash. The preimage hash is simply the hash of the proposal to be enacted. The easiest way to get the preimage hash is by clicking on the "Submit preimage" button as shown in the previous section.
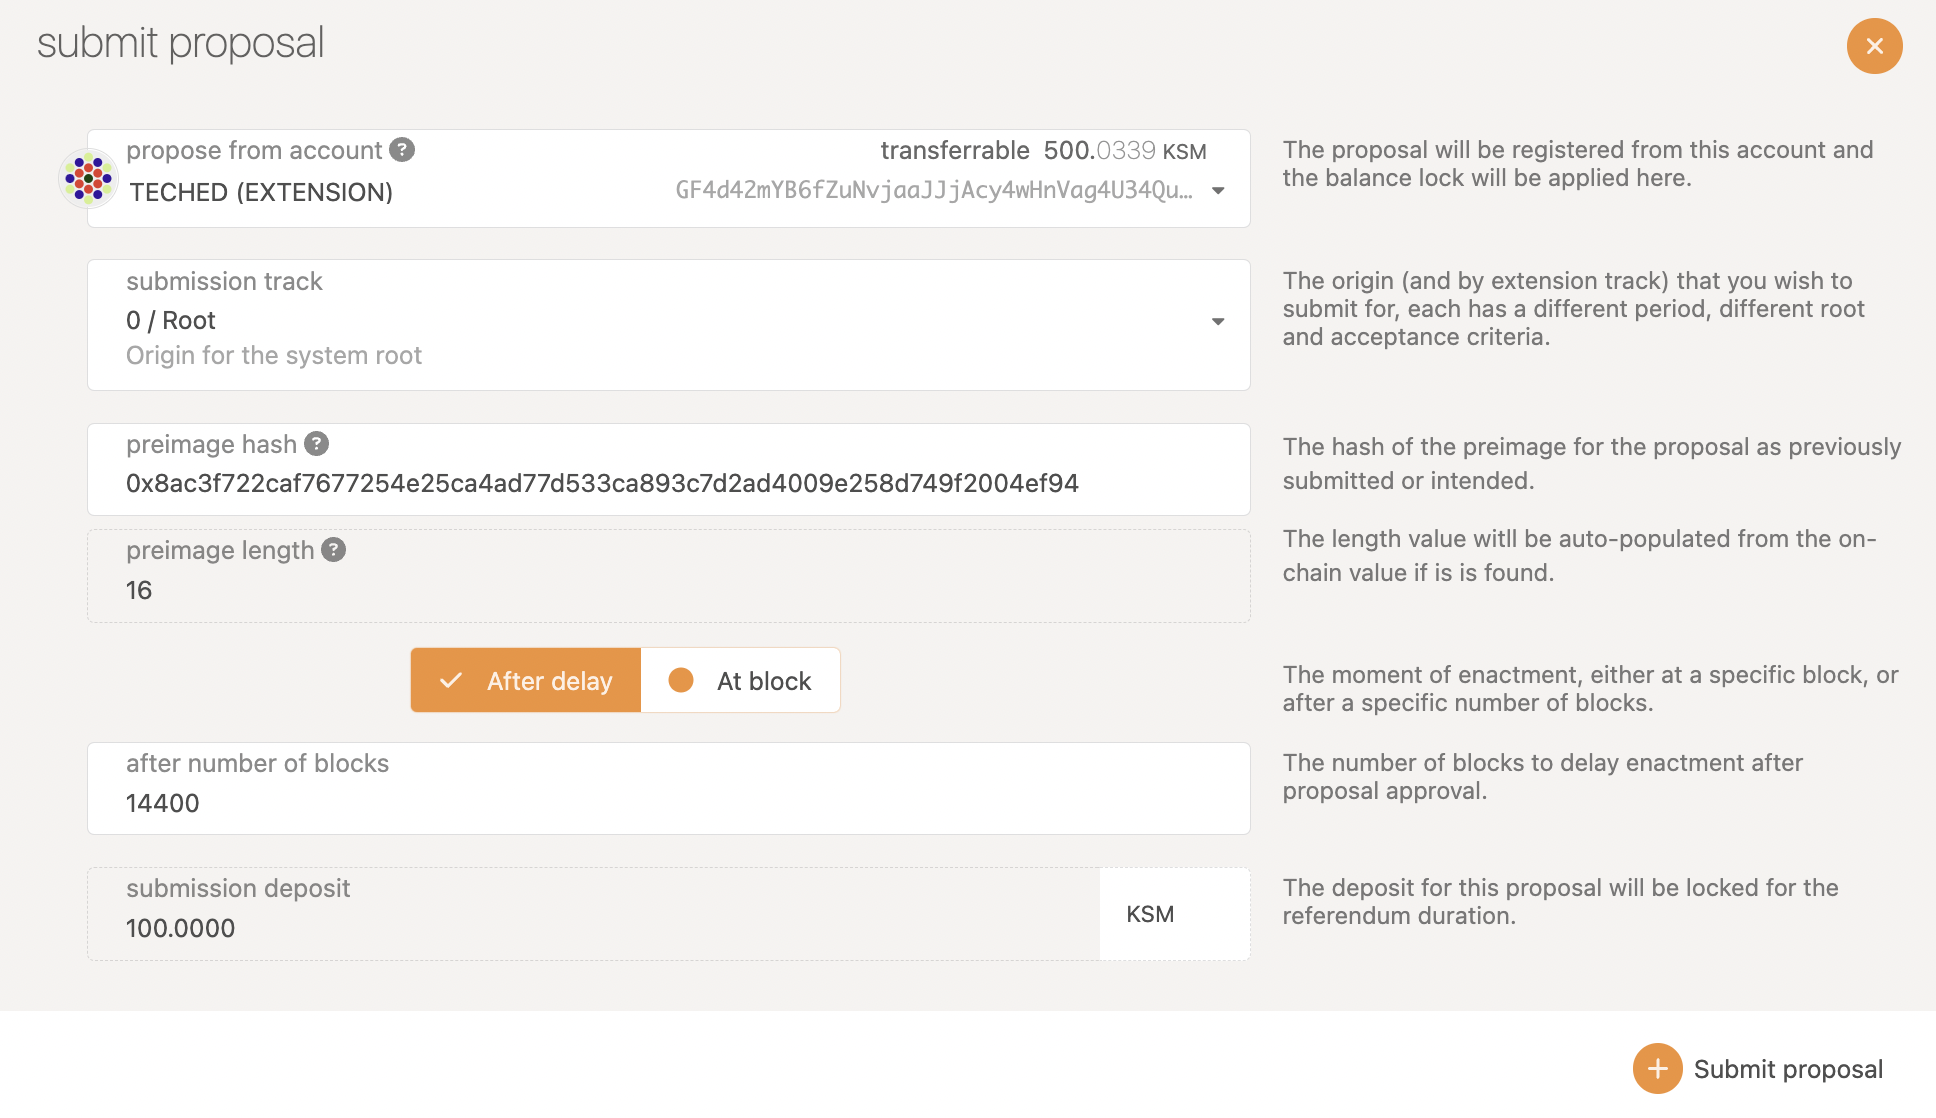
The proposal will be registered from the account selected and the balance lock will be applied to it. An appropriate origin must be chosen, as each origin has different privileges, and acceptance criteria. After entering the hash of the preimage for the proposal, the preimage length field is automatically populated. The enactment delay can be specified either as a block number, or as a specific number of blocks after the referendum is approved. The deposit for this proposal will be locked for the referendum duration.
Submitting a Referendum on the Whitelisted Caller Track
Let's consider increasing the number of validators participating in parachain consensus. You could submit a preimage with the call that sets the number of validators to 1,000 and submit a referendum to the Root track directly. However, this requires a large decision deposit and has very conservative passing parameters such that it will probably need the entire 28-day voting period to pass.
Operations that are deemed safe or time critical by the Polkadot Technical Fellowship can use the Whitelisted Caller track. This track requires less turnout in the first half of the decision period so that it can pass more quickly. This track is typically used for more neutral, technical proposals like runtime upgrades or changing the system's parachain validation configuration.
Using the Whitelisted Caller track requires some special calls. Submitting a referendum in the same
form as other tracks will not work. Namely, rather than voting on a particular proposal, the
Whitelisted Caller track requires a vote to dispatch the proposal via the Whitelist pallet.
Before opening a referendum on this track, you should also attempt to get a positive signal from the
Fellowship that they will whitelist the proposal. If they do not, then even if the public referendum
passes, it will not execute.
Below are the steps to follow when submitting a proposal to the Whitelist track.
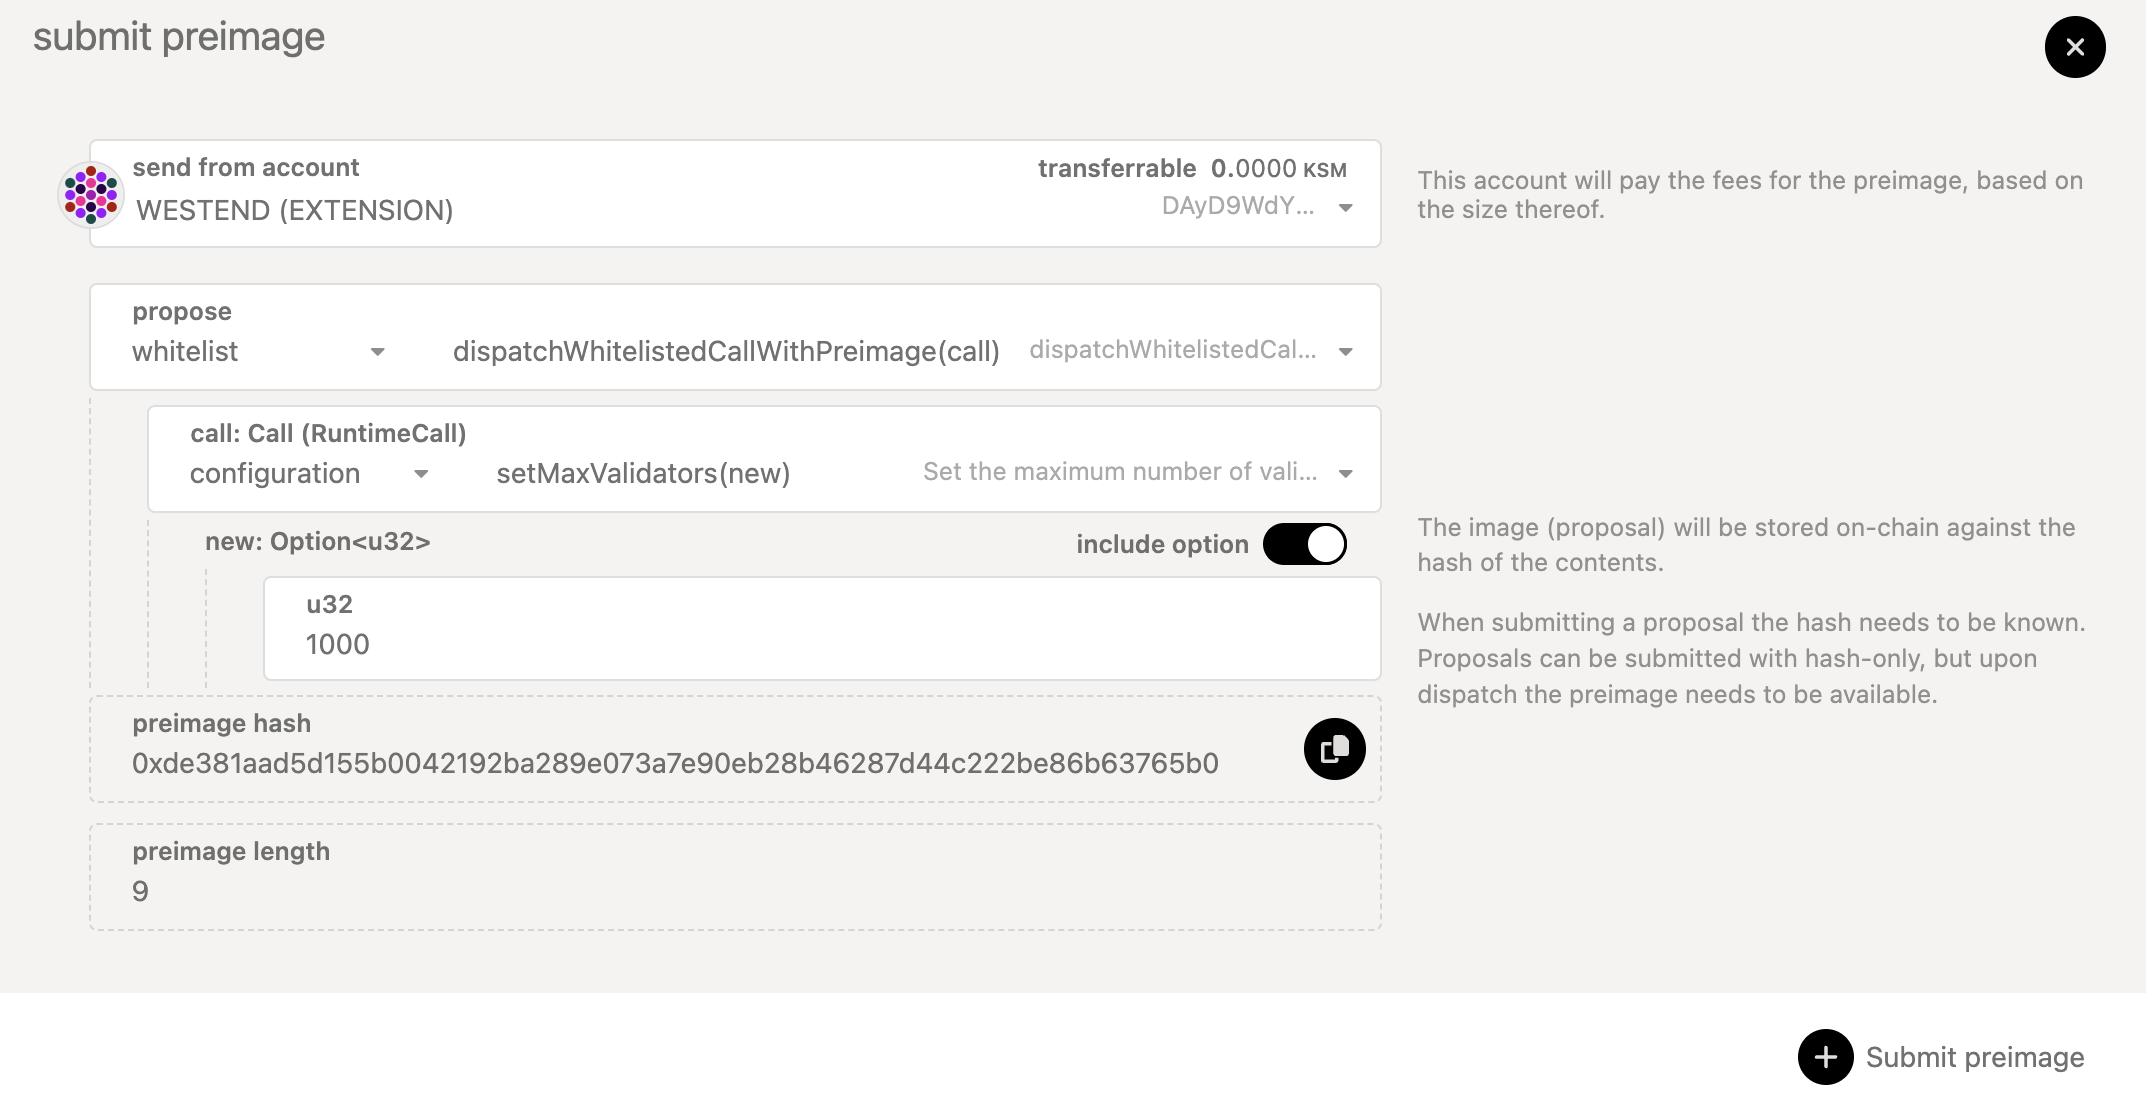
- Submit a preimage with the call to dispatch the proposal (
call) you want to submit --whitelist.dispatchWhitelistedCallWithPreimage(call)-- and obtain the preimage hash. This is the preimage for the public referendum on the Whitelisted Caller track.
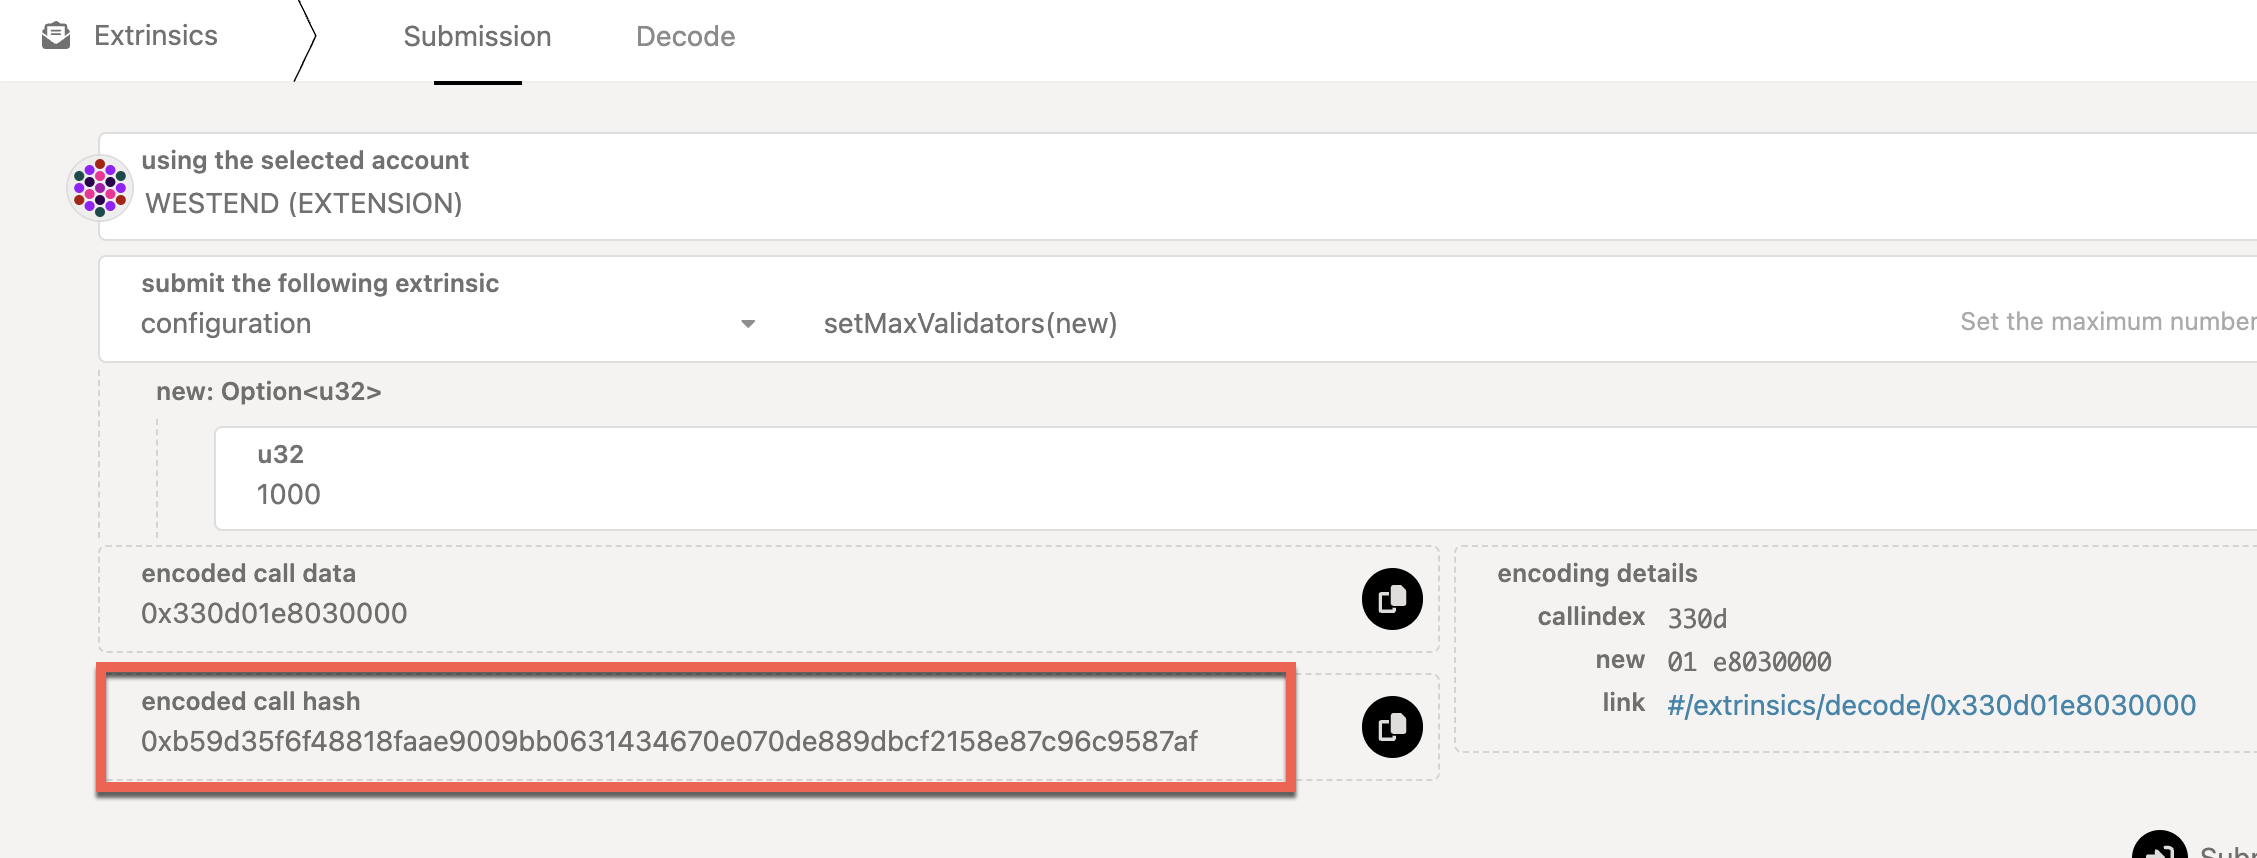
- Obtain the hash of
call. The Polkadot Fellowship needs to start a Fellowship referendum to whitelist the call withwhitelist.whitelistCall(callHash). The Fellowship referendum gets voted on by the Polkadot Fellowship members only.
- The public now votes on the referendum. Someone must place a decision deposit to go into the deciding phase.
- Once passed, it gets enacted successfully as long as the call has been whitelisted by the Fellowship.
Note that the public referendum and Fellowship referendum can happen simultaneously. However, if the Fellowship does not whitelist the call, you must submit it directly to the Root origin.
Voting on Referenda
As Polkadot OpenGov takes both the approval and support into account, there are four options to choose from when voting on a referendum:
- Aye
- Nay
- Split
- Abstain
Also, you have to specify the conviction multiplier for this vote. The longer you are willing to lock your tokens, the stronger your vote will be weighted. Unwillingness to lock your tokens means that your vote only counts for 10% of the tokens that you hold.
For detailed instructions on how to vote on Polkadot OpenGov referenda, check this support guide.
Polkadot OpenGov uses Conviction Voting Pallet (Not Democracy Pallet)
Use convictionVoting.vote for voting on Referenda in Polkadot OpenGov instead of democracy.vote (which only works for the old version of governance).
Removing Votes
To remove votes, you need to use the Extrinsics tab and
call the removeVote function through the convictionVoting pallet.
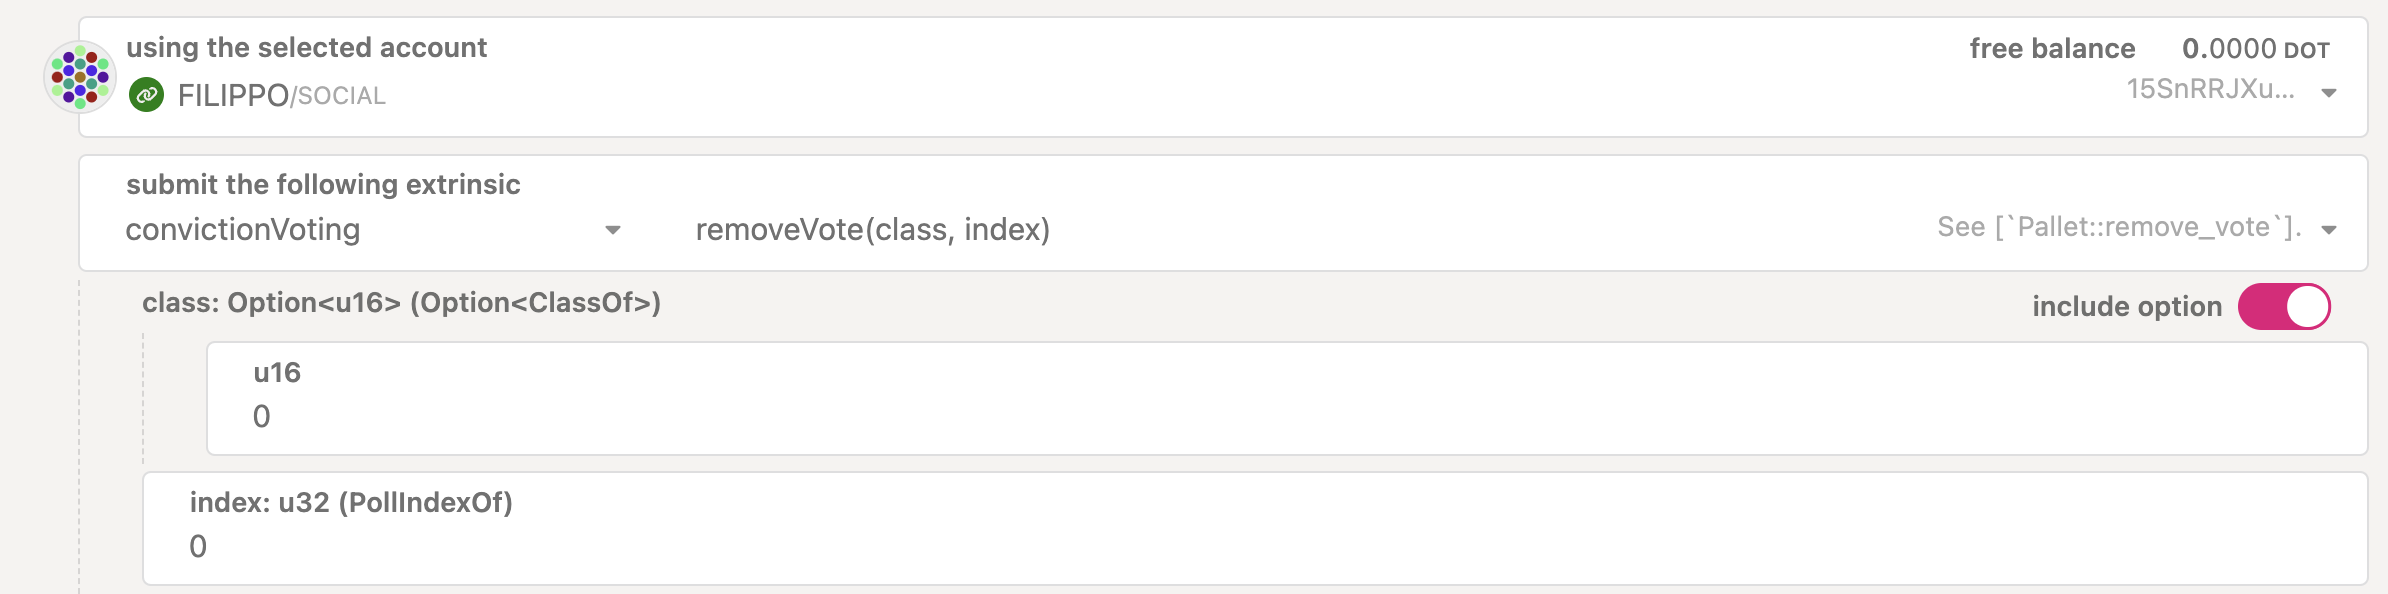
The class is the OpenGov track of the referendum you voted
on and the index is the referendum number.
Removing Expired Voting Locks
To remove an expired lock, you need to use the
Extrinsics tab and call the unlock function through
the convictionVoting pallet. Note that if you voted on referenda in multiple tracks, the tokens
will be unlocked after removing votes and unlocking on all the tracks. Similarly, if you you
delegated on multiple tracks, the funds will be unlocked after
undelegating and unlocking on all the tracks.
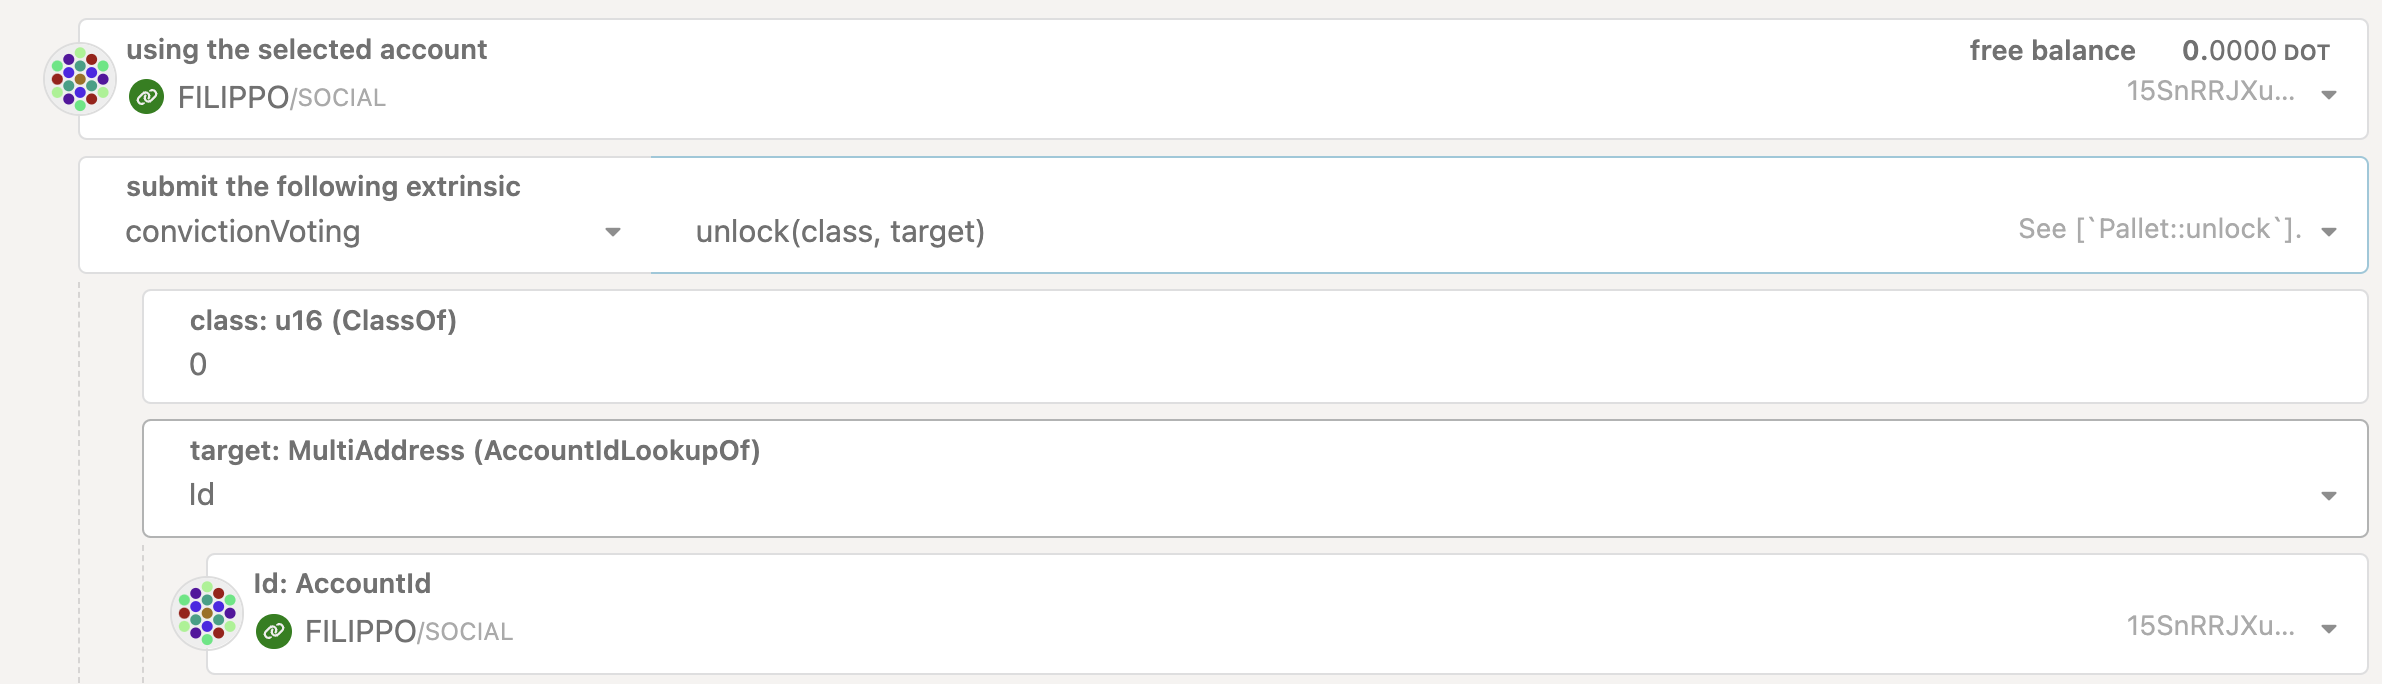
The class is the OpenGov track where you have the lock.
For additional instructions, check this support guide.
Delegations
Video Tutorial about Delegations using the Polkadot-JS UI
See this video tutorial to learn about how to delegate, modify delegations and remove delegations using the Polkadot-JS UI.
For an overview of how delegation works in Polkadot OpenGov, check out the Multirole Delegation section on the Learn Polkadot OpenGov page.
Instructions to do delegations with Polkadot-JS are also available on the Support Pages.
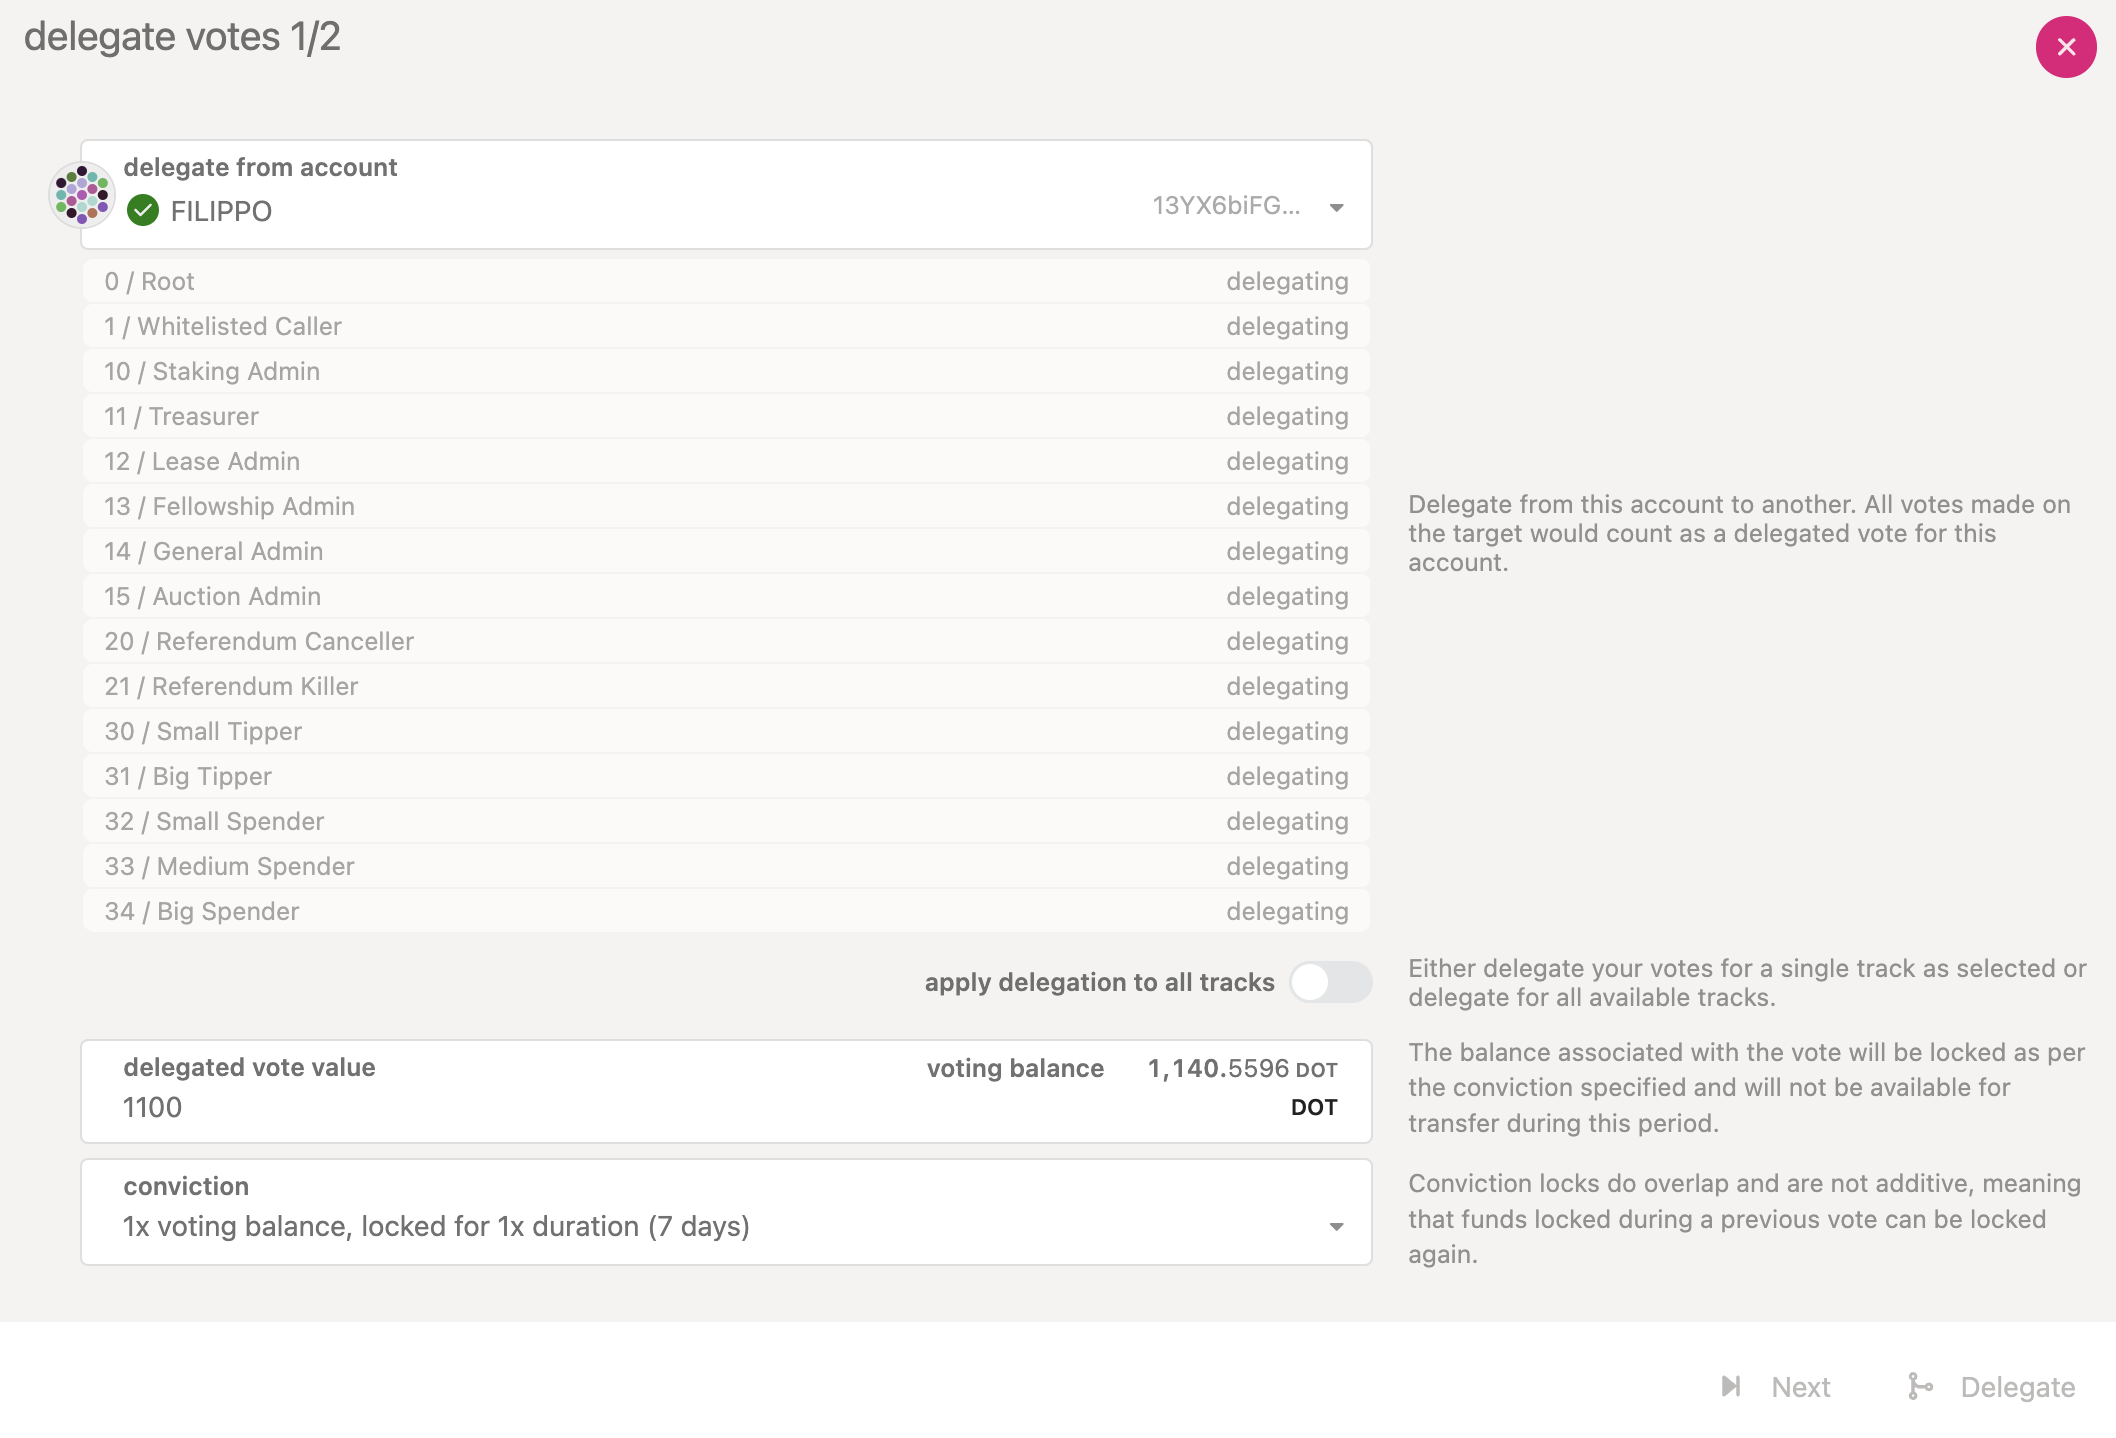
Delegate Votes
You can start delegating your votes by clicking the "Delegate" button on Governance > Referenda.
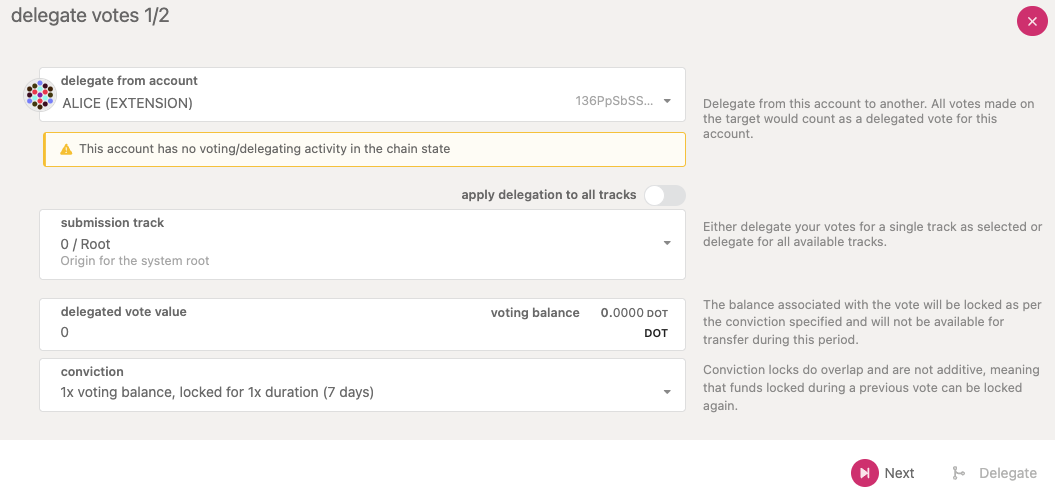
If it is the first time you delegate or vote, there will be a banner message. You can delegate on a single track or all the tracks. You have an option to specify the number of votes (i.e., the number of tokens) and the conviction multiplier. After clicking "Next", you will need to specify the account to delegate your votes to, and after clicking "Delegate" and "Sign and Submit" your delegations will appear for each track (see below).
Note that if you want to delegate just a few tracks, you have two options:
- Repeat the process using the "Delegate" button multiple times
- Issue a batch call with multiple
convictionVoting.delegateextrinsics under Developer > Extrinsics
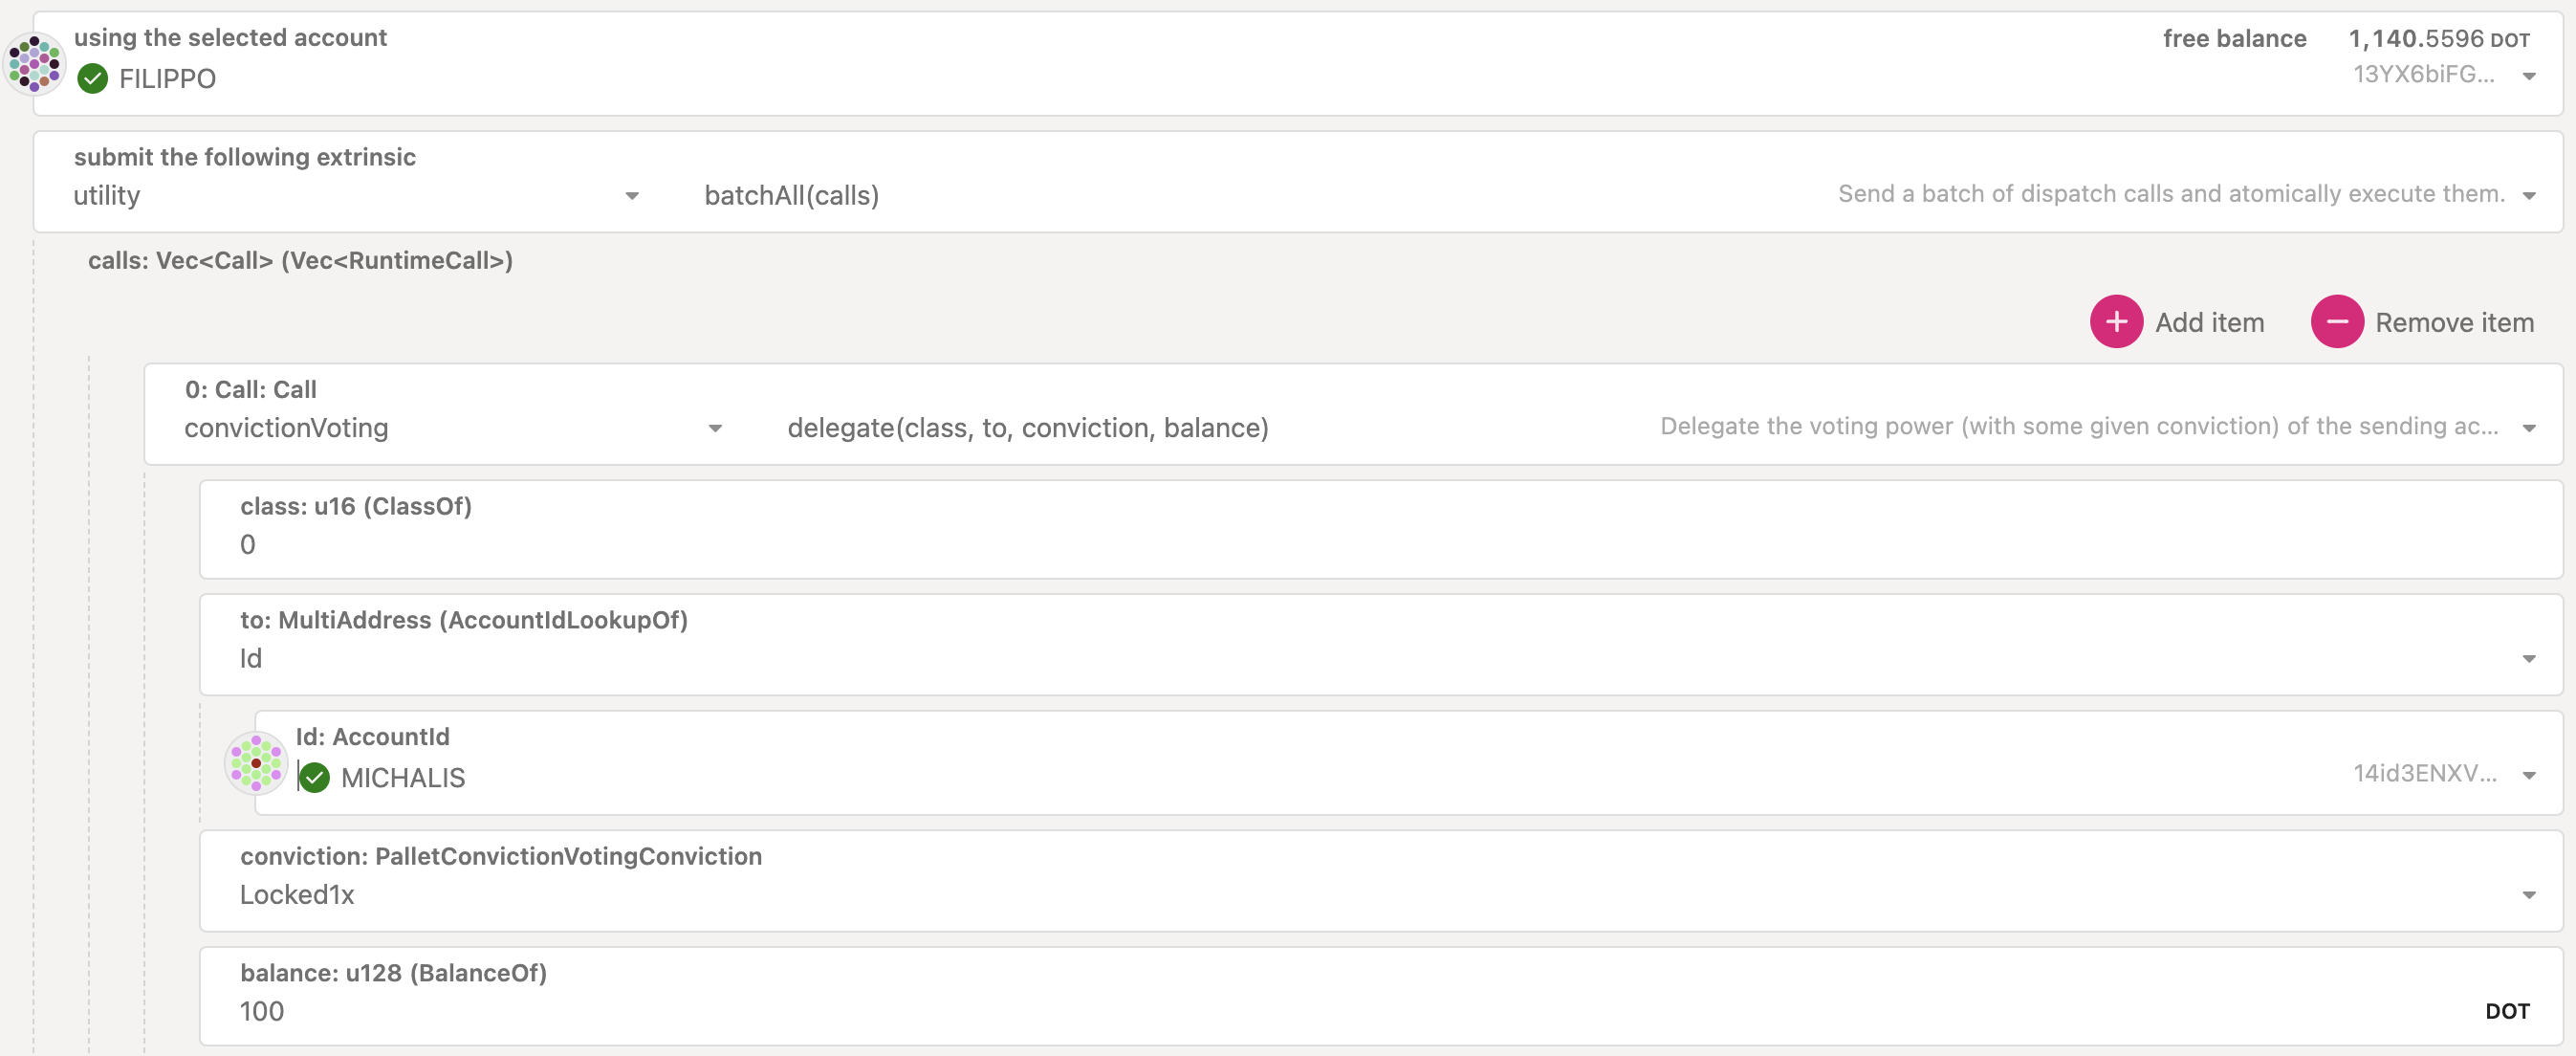
By clicking on "Add item" you can add new extrinsics for multiple tracks.
Undelegate Votes
The "Delegate" button on Governance > Referenda is only
for delegating votes. You cannot undelegate or modify your delegations. If you wish to undelegate,
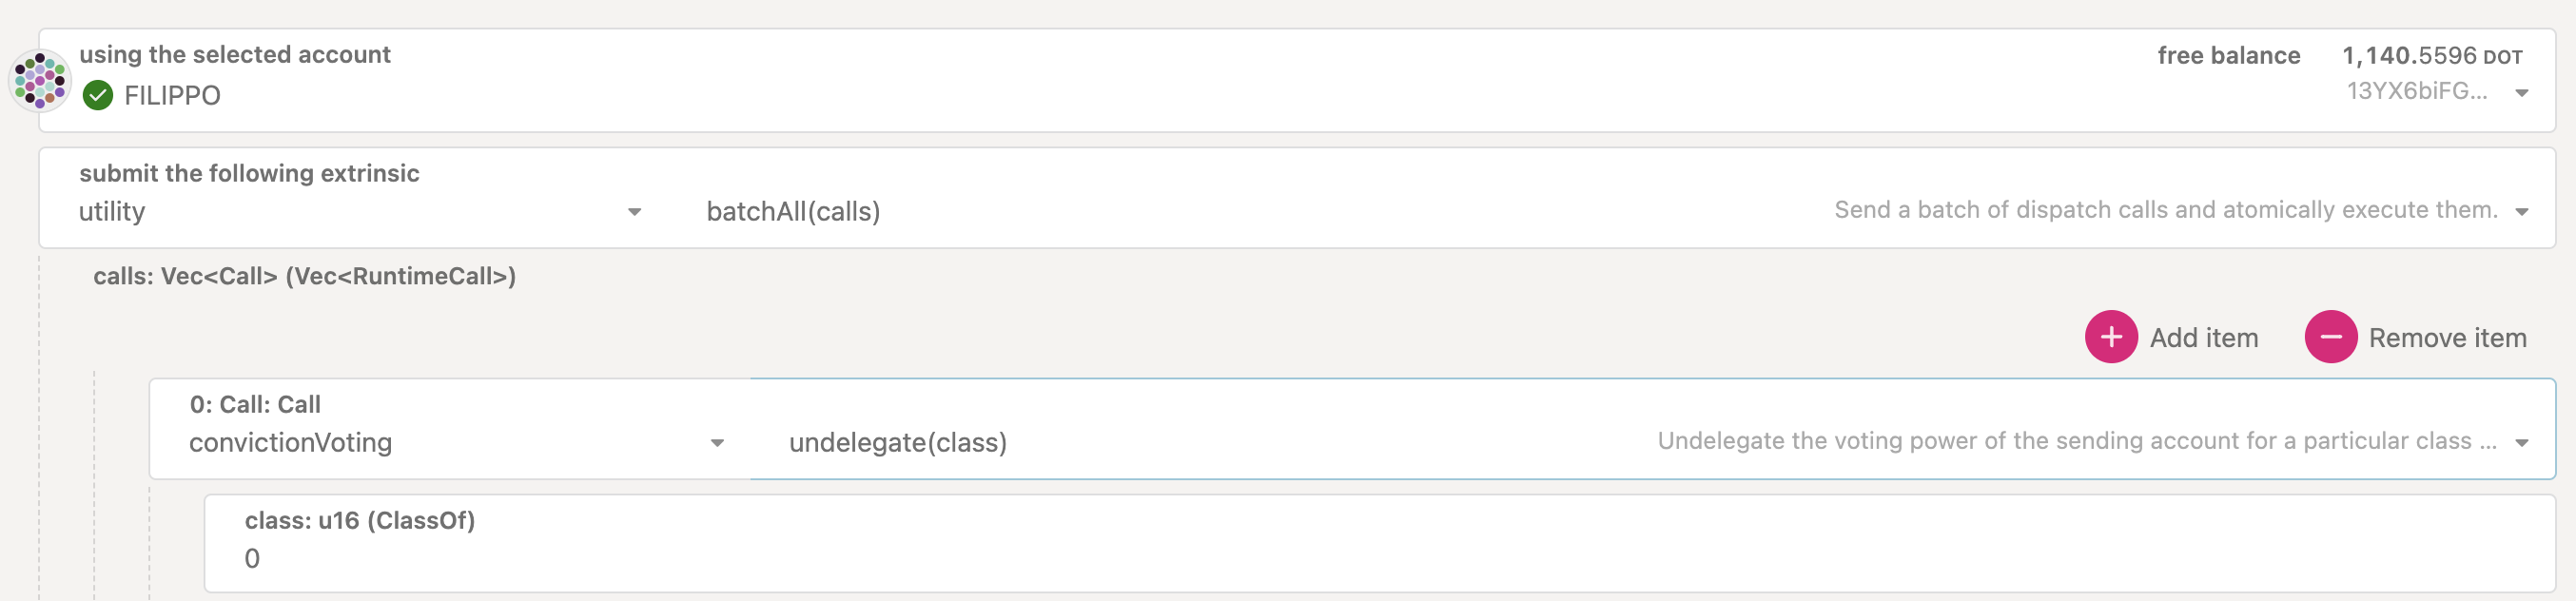
you will need to go to Developer > Extrinsics and
submit a convictionVoting.undelegate extrinsic, specifying the track you wish to undelegate.
Undelegated tracks will show up as "0 votes" on the Delegate tab.

After you undelegated, the conviction lock will start the countdown, and your funds will be available for unlocking after the countdown ends.
Remove Expired Locks from Delegations
To remove expired locks from delegations, you can follow the same procedure as how to remove expired voting locks.
Modify your Delegations
The "Delegate" button on Governance > Referenda is only for delegating votes. You cannot undelegate or modify your delegations. If you wish to update the delegated account, the conviction, and the number of votes you will need to go to Developer > Extrinsics, undelegate the track and delegate again with updated information.
Claiming OpenGov Deposits
Video Tutorial about OpenGov deposits using the Polkadot-JS UI
See this video tutorial to learn about how to claim OpenGov deposits using the Polkadot-JS UI.
Claiming the Preimage and Decision Deposits
After a referendum finishes its life cycle (and gets approved or rejected or timed out), the preimage and decision deposits can be claimed. For claiming the preimage deposit, navigate to Polkadot-JS UI > Governance > Preimages and click on unnote button shown on the preimage you submitted.

Similarly, to claim the decision deposit, navigate to Polkadot-JS UI > Governance > Referenda and scroll down to the end of the page to click on the referenda with the decision deposit and claim it.

Claiming the Referendum Submission Deposit
The submission deposit for a referendum can be claimed
only if the referendum was Approved or Canceled.
The submission deposit can be claimed by issuing the refundSubmissionDeposit extrinsic.
Users can not refund their submission deposit while the referendum is Ongoing or Rejected.
Similarly, users cannot refund their submission deposit if the proposal has TimedOut (failing to
submit the decision deposit
within specific period will lead to a
referendum timeout). This behavior exists so that users can refrain from spamming the chain with
proposals that have no interest from the community. If a proposal is in the TimedOut state, any
user can call slash_proposal_deposit, which will move the funds from the user to a
runtime-configured account, like the treasury.
To refund your slashed deposit, you can start a new referendum and specifically request a refund from the treasury. You need to make sure you have enough balance for a new submission and decision deposit, and you will need to select the right track to ask for a refund. For example, the Small Tipper Track would be fine for any kind of deposit refund up to 250 DOT (8.25 KSM on Kusama).
Cancel or Kill a Referendum
Info
Anybody can cancel an ongoing referendum (i.e., a referendum within the Lead-in or voting/confirmation period). For more information about the referenda timeline in Polkadot OpenGov, see the dedicated page.
To successfully cancel a referendum through the track 20 / Referendum Canceller, you will need to
attain
specific approval and support levels.
To cancel a referendum, you need first to submit a preimage with the referenda.cancel extrinsic.
Go to the Polkadot-JS UI > Governance > Referenda and
click on the "Add Preimage" button. You must specify the referenda.cancel extrinsic with the index
equal to the ongoing Referendum you wish to cancel. In the screenshot below, the Referendum to be
cancelled is 249.

This call will cancel the referendum and return the deposit. You can also kill a referendum using
the referenda.kill extrinsic. This will cancel the referendum and slash the deposit.
Preimage Submission Deposit
A deposit is required for the preimage to be stored on chain. The preimage deposit is proportional to the amount of information stored within the preimage. The deposit amount required for a preimage with a treasury spend transaction is around 41 DOT (1.4 KSM on Kusama). Ensure you have enough account balance to pay for this submission deposit as well as the transaction fees.
Once a preimage is submitted, it can be checked under Governance > Preimages.

You must copy the preimage to use it when you submit your proposal. To submit the proposal to cancel referendum 249, for example, you need to go under Governance > Referenda and click the "Submit Proposal" button.
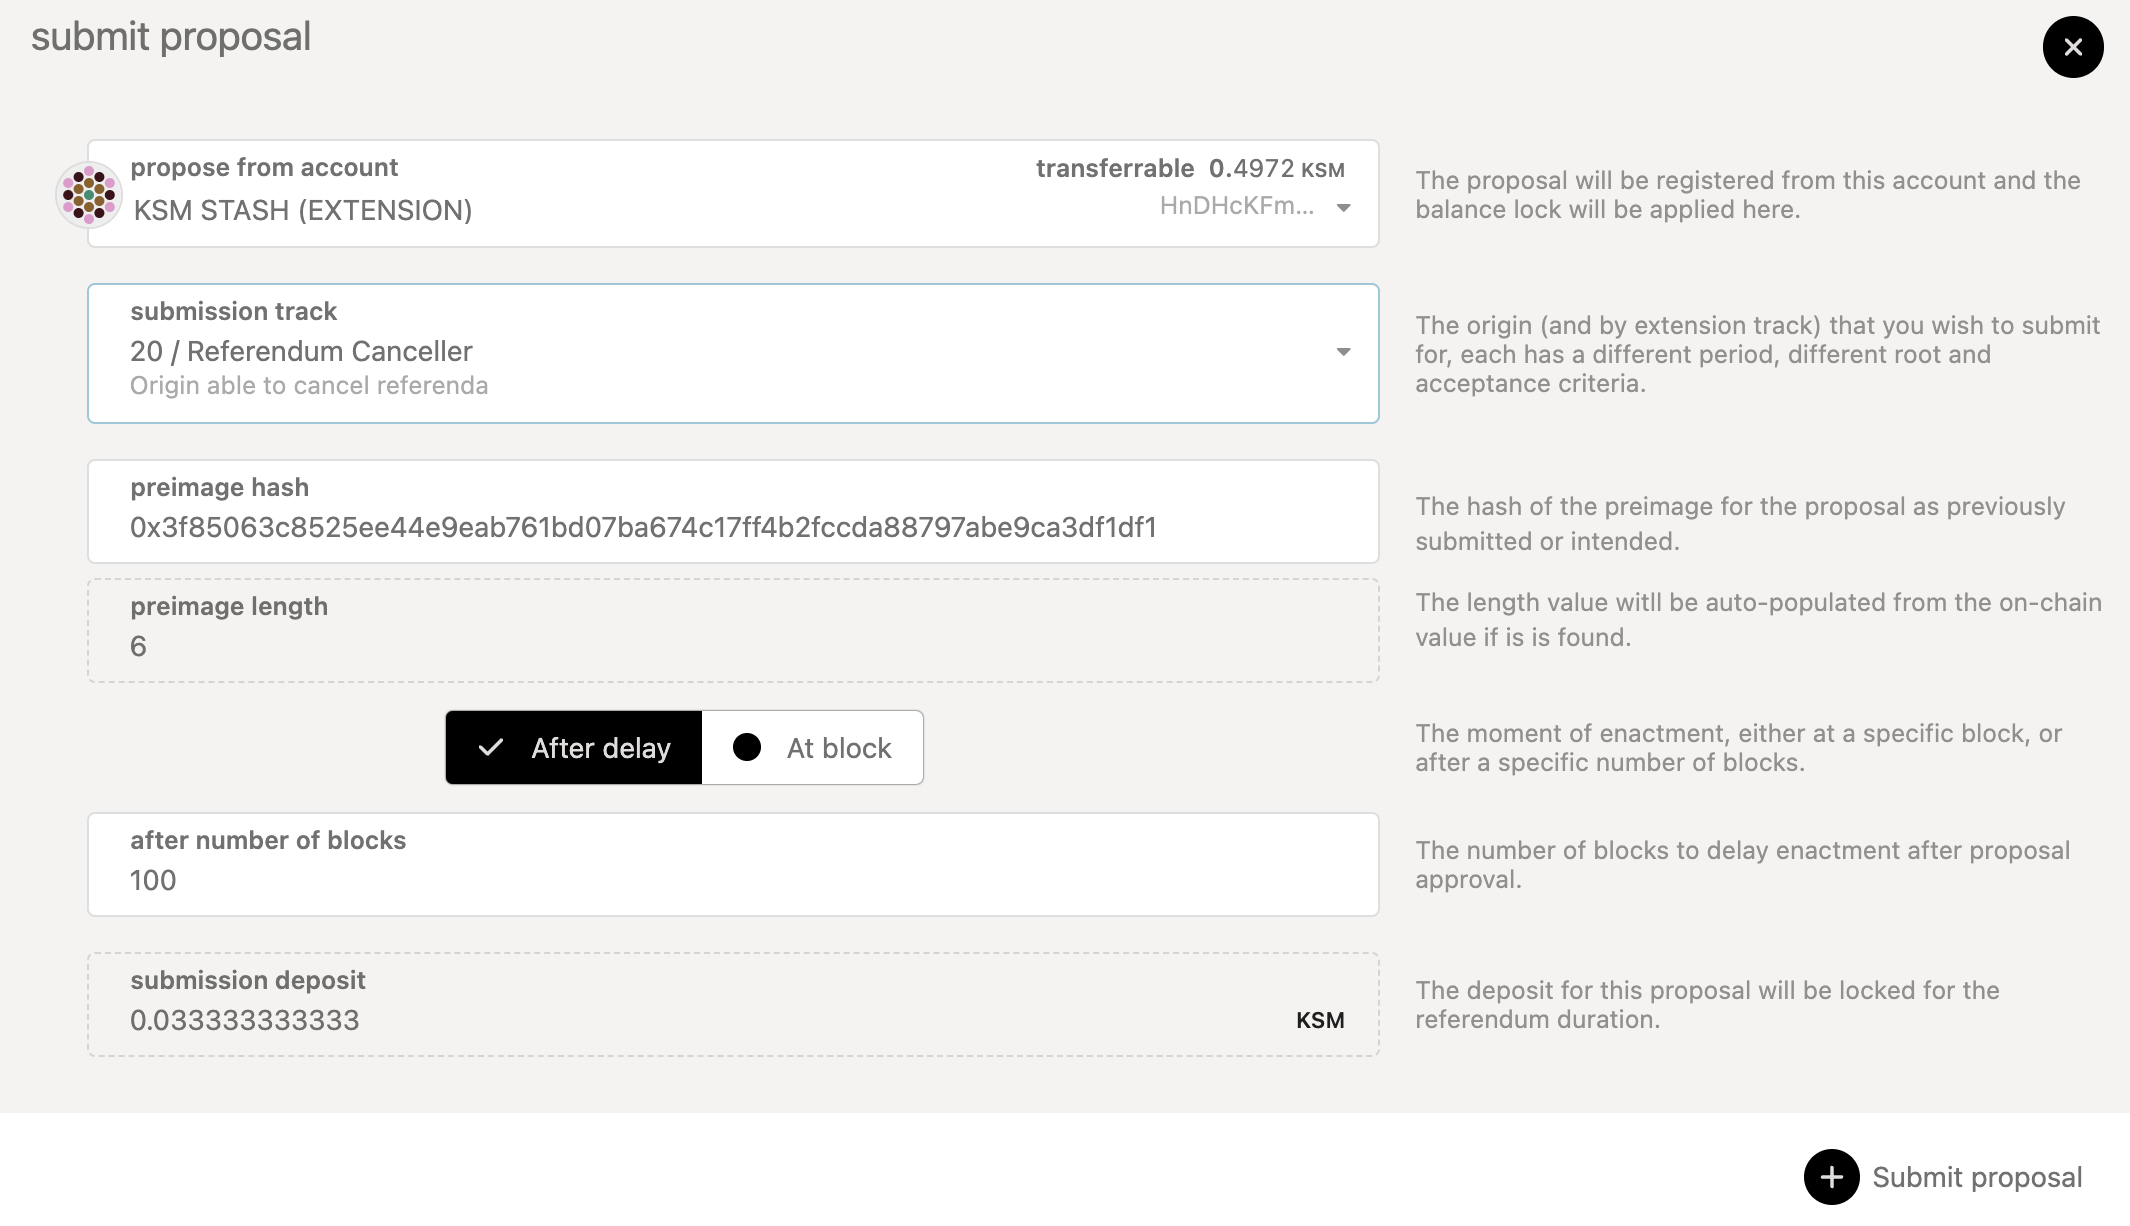
You must specify the account to submit the proposal (this can differ from the account used to create
the preimage). Then you will need to specify the track 20 / Referendum Canceller and add the
preimage hash containing the specific action that will be enacted if the referendum passes. Note
that a submission deposit will be
reserved for submitting the proposal.
Once the proposal has been submitted, it will stay in the Lead-in period until there is enough space within the track, and a track-dependent preparation period and decision deposit have been met. Failing to submit the decision deposit will ultimately lead to a referendum timeout.
Interpreting On-Chain Voting Data
Below is the numeric conversion of the type of vote and conviction displayed in a block explorer.
Nay 0.1x => 0
Nay 1x => 1
Nay 2x => 2
Nay 3x => 3
Nay 4x => 4
Nay 5x => 5
Nay 6x => 6

Aye 0.1x => 128
Aye 1x => 129
Aye 2x => 130
Aye 3x => 131
Aye 4x => 132
Aye 5x => 133
Aye 6x => 134
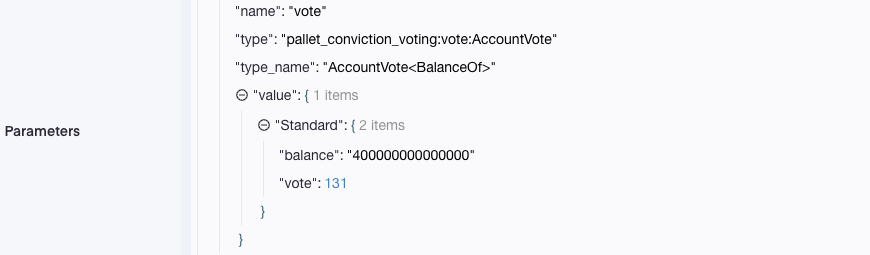
Take, for example, the information provided for
this vote. The vote 131 means the account voted
Aye with 3x conviction.
At first glance, it may not be easy to interpret what you voted on. We need to take a step back and consider the "voting data" at the binary level.
The vote is stored as a byte using a bitfield data structure and displayed on the block explorer as a decimal integer. The bitfield stores both the conviction and aye/nay boolean, where the boolean is represented using the MSB of the byte. This would mean that the seven remaining bits are grouped to store the conviction.